Last time we talked about handling those pesky “Unhandled Fault” errors in Flow. After you’ve been tracking your errors for awhile you’ll start to notice a pattern. Most of your errors will be from either Bad Data or Permissions issues. We’ll talk about permission issues another time, but for now lets focus on preventing those data issues.
If we’re creating flows with user input, we have to help our users enter the data correctly. There’s nothing worse than having your beautifully crafted flow come crashing down because your user put 11 characters into a text box when the field can only hold 10 characters. So how do we keep this from happening? Input validation to the rescue!
Most of the flow input types let you specify an “Input Validation”. These work like validation rules with one important difference – they fire when the formula is FALSE, which is the opposite of how regular validation rules work. In other words, if the formula evaluates to true the input is accepted. You can specify validations on Textbox, Long Text Area, Number, Currency, Date, Password, and Checkbox inputs.
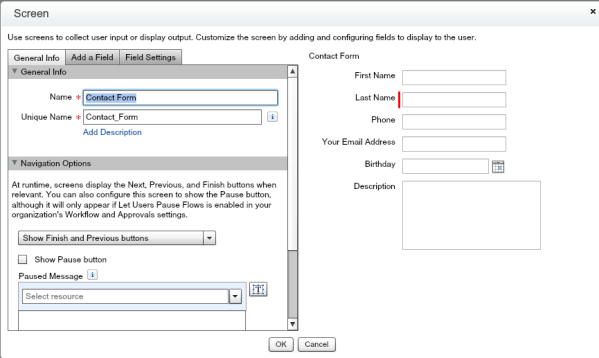
Let’s build a test flow that creates a new contact record. We’ll need inputs for First Name, Last Name, Phone, Email, Birthdate, and Description. Birthdate will be a Date input and Description is a Long Text Area. All the rest are Textbox inputs. Last Name is required on the contact record, so I made it a required field on our flow. We should end up with something that looks like this:
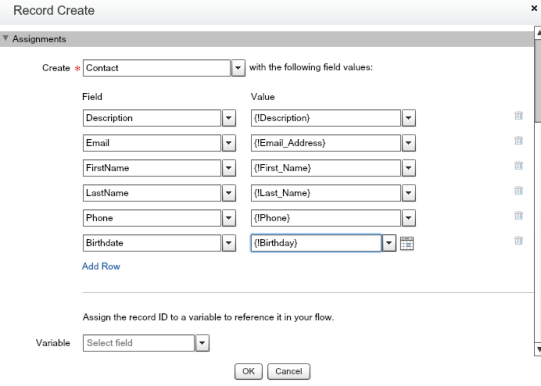
You can connect this up with a Record Create on Contact like so:
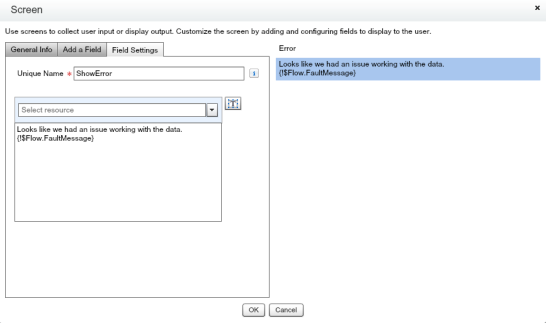
and a screen to direct errors to (or use your error subflow):
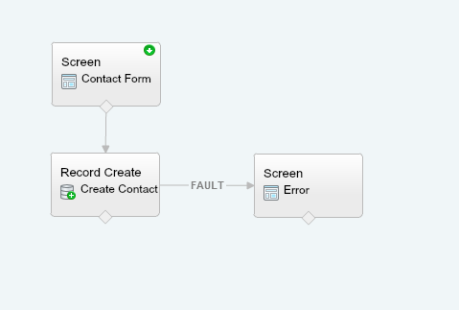
Put it all together and you should have something like this:
Flow Tip – To draw a Fault Connector from an element without having a normal connector already drawn from that element:
- Draw a normal connector (ex. from Create Contact to Error)
- Draw the connector again (it will be the Error Connector)
- Click on the arrow to select it and hit ‘Delete’ key.
- The regular connector is deleted, leaving just the Error Connector.
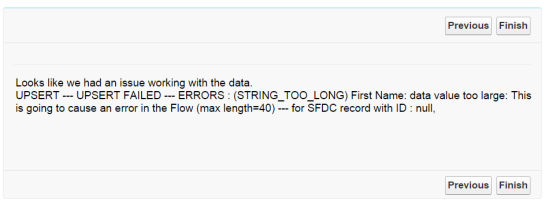
When running this flow, as long as we put in data that matches the constraints of our fields, we’ll successfully create a contact record. But what happens if we accidentally put in some bad data? For example, the First Name field on Contact is a Text field 40 Characters in length. What if I put more than 40 characters in there. Try it and see!
Did you get an error like this?
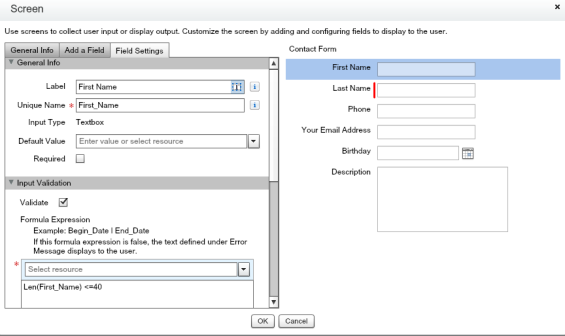
Lets validate the input by checking the Validate box on the input and entering a formula (in the standard Salesforce syntax) that evaluates to either true or false. Since we want to limit the characters to 40 or less, we could use something like:
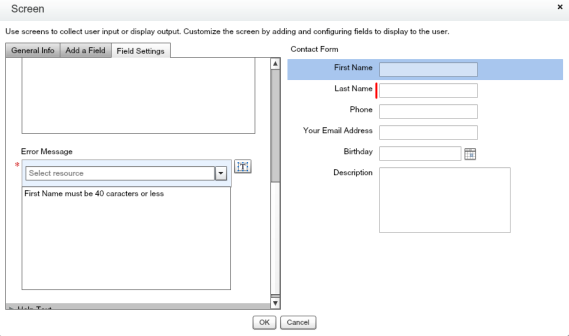
We can also customize the error message so if the user enters invalid input we can prompt them for the correct format:
Save & run your flow. Now if you enter more than 40 characters you’ll get a friendly error message telling you that’s not allowed. And that’s one less possible error your flow can produce which will make both you and your users happy.
Here’s some general rules on input validation to be aware of:
- The formula expression must return a Boolean (true/false) value.
- If flow contains an invalid formula, then you can’t activate that flow (you’ll get a warning when saving).
- If the field is left blank, and the field is not required, no validation is performed.
- A formula in a flow can’t contain more than 3,000 characters
- Formulas in flows don’t support all functions. Using these functions results in your formula returning null:
- GETRECORDIDS
- IMAGE
- INCLUDE / INCLUDES
- ISCHANGED
- ISNEW
- ISPICKVAL
- PARENTGROUPVAL
- PREVGROUPVAL
- PRIORVALUE
- REQUIRE SCRIPT
- VLOOKUP
Real World Examples:
Let’s look at some examples that you can customize to your own needs:
- Birthdate must be before year 2001
- YEAR({!Birthday}) < 2001
- Phone number must be 10 digits long and numbers only
- ISnumber(phone) && Len(phone)=10
- Limit a long text area to 500 characters
- Len({!description} <= 500
- Number must be between 1 and 10
- NumInput >=1 && NumInput <= 10
What about text input fields where we need to make sure the information is entered is a specific format or pattern? What happens if your user enters “no email” in the email input? Yep, you’re going to get an error. Fortunately (or unfortunately) we can use REGEX to enforce pattern matching. I’m not a regex expert and freely admit I have a bit of a love/hate relationship with it. Most of what I’ve learned comes from looking at other people’s examples and modifying them for my own uses. So rather than try to teach you regex, let me share with you some examples I use over and over in my flows. Feel free to copy and use in your flows. Note: If you copy directly into a flow you may get a syntax error. This is because the font here uses a non-standard double-quote character. Just update the double-quote character and you should be good to go.
- Only accept email address in valid format.
- REGEX({!Email_Address},”[a-zA-Z0-9._%+-]+@[a-zA-Z0-9.-]+\\.[a-zA-Z]{2,4}”)
- Only accept valid website formats (starts with http, https, www, and ends in .xyz)
- REGEX({!Website_Address},”^((http|https)://)??(www[.])??([a-zA-Z0-9]|-)+?([.][a-zA-Z0-9(-|/|=|?)??]+?)+?$”)
- Require website address to start with http:// or https://
- REGEX({!webaddress},”^(http|https)://(www[.])??([a-zA-Z0-9]|-)+?([.][a-zA-Z0-9(-|/|=|?)??]+?)+?$”)
- Enter only letters (no spaces, numbers or special characters) up to max length x (1-10 characters this example).
- REGEX({!First_Name}, “^[A-Za-z]{1-10}$”)
- Enter in SSN format 999-99-9999
- REGEX( Social_Security_Number__c , “[0-9]{3}-[0-9]{2}-[0-9]{4}”)
- US Zip code in 55555 or 5555-5555 format
- REGEX(BillingPostalCode, “\\d{5}(-\\d{4})?”)
So now that you’ve got Input Validation on your Flow Utility Belt, you need to take the Flow Pledge. Raise your right hand and repeat after me “If given the option, I will always validate my input to prevent errors and bad data”.
Got a cool validation you use in your flows? Please share! The Dude is always looking for cool solutions.

Reblogged this on SutoCom Solutions.
LikeLike
great article on this!
LikeLike
Thanks Salesforce dude! I refer to this blog often to “jog my memory” on Regex examples! (Especially for different type fields – ie since numbers you can’t use the LEN or REGEX functions).
LikeLike
Awesome article
LikeLike
thank great post
LikeLike
It’s a shame yoᥙ don’t have a donate button! I’d certainly ⅾonate to
this excellent blog! I guess for now i’ll settle for book-marking and adding your RSS feed to my Googlе account.
I look forward to fresh updates and will share this sitе with my Facebooк group.
Talk soon!
LikeLike